Options
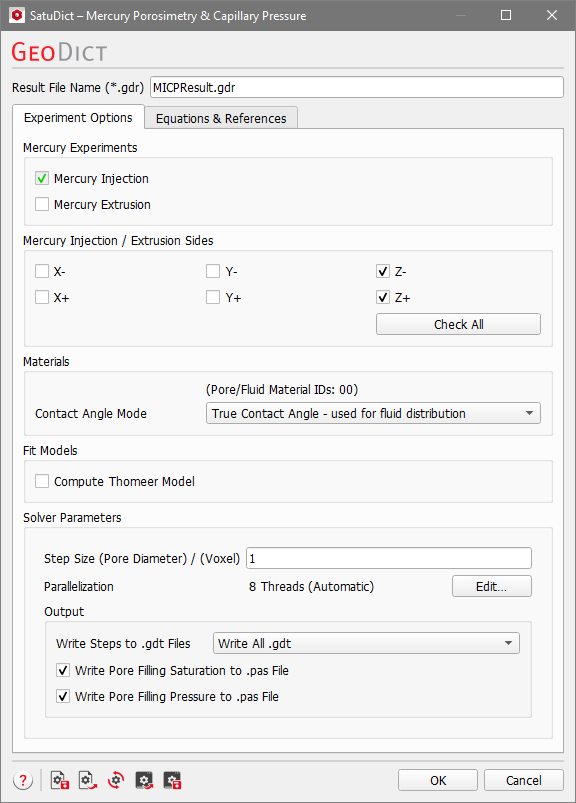
The Mercury Porosimetry & Capillary Pressure dialog opens when clicking the Edit… button and includes the Experiment Options tab and the Equations & References tab, which cites several references.
At the top of the dialog, enter the Result File Name. The result file is saved in the chosen project folder (File → Choose Project Folder in the menu bar).
Mercury Experiments
The option Mercury Injection is always selected and cannot be unchecked. You can additionally choose to compute also the Mercury Extrusion.
Mercury Injection/Extrusion Sides
Similar to the Boundary Conditions in Capillary Pressure Curve, you have to choose from which domain sides the mercury can enter the structure and leave the structure if Mercury Extrusion is computed.
For ease of use you can click on the button Check All if the mercury can intrude from all sides.
|
Note! In Contrast to the Capillary Pressure Curve command, you cannot chose a domain side to be the displaced fluid outlet because no residual remains in the structure. |

Materials
The shown Material IDs are the pores that fill be filled with mercury during the simulation.
Below, you choose the Contact Angle Mode used for the distribution of the mercury and the computation of the capillary pressure. The same options as for the Capillary Pressure Curve are available, but an angle of 40° is assumed for all solid materials.
Fit Models
Select if you want to compute the Thomeer Model based on the computed capillary pressure curves. The Thomeer Model can also be computed afterwards as post-processing step in the Result Viewer.
Solver Parameters
Step Size (Pore Diameter / Voxel)
The algorithm increases or decreases the sphere diameter (and thus changes the capillary pressure) from step to step by this amount. Small values increase the accuracy of the result but lead to longer calculation times. The same options is also available in the Capillary Pressure Curve command.
Parallelization
Control how many threads are used for the computation. Parallelization is possible if your license and hardware allow it. The Parallelization Options dialog opens when clicking the Edit button, to choose between Sequential, Parallel (Shared Memory) or Automatic Number of Threads.
Selecting Sequential will not apply parallelization.
When Parallel (Shared Memory) is selected, the Number of Threads can be entered. Below, the maximum number of available threads and the maximum number of licensed parallel processes is shown in the dialog.
If Automatic Number of Threads is selected, the number of parallel processes is automatically selected for optimal speed, based on the CPU cores and licensed parallel processes.
For up to eight Available Threads, all of them will be used. If more than eight threads are available, two cases might occur.
- The number of Available Threads is larger (or equal) than the Number of CPU Cores:
- Then the maximum of eight and Number of CPU Cores divided by 2 is used.
- The number of Available Threads is smaller than the Number of CPU Cores:
- Then the maximum of eight and number of Available Threads divided by 2 is used.
Output
The same options as for the Solver Parameters in Capillary Pressure Curve are available. The saved result files can be loaded from the Data Visualization tab in the result viewer.
